4 Survival shelters you can build from scratch when SHTF
03/07/2019 / By Mary Miller
Finding shelter should be your top priority if you ever get lost somewhere far away from civilization. While extreme thirst or hunger can take anywhere from three days to a few weeks to kill you, exposure to the harsh elements can quickly take your life in a matter of hours. The good news is that you don’t need a lot of experience or equipment to build your own temporary shelter. When SHTF, here are four survival shelters you can build using only what nature can provide. (h/t to PreppersWill.com)
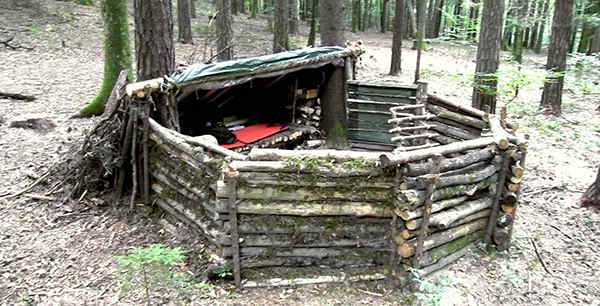
Round lodge shelter
One of the simplest shelters that can be built with minimal equipment, the round lodge shelter takes its architectural influences from many different cultures. Part Native American tipi and part wickiup, the round lodge shelter is built in a triangular cone shape that can provide adequate protection from the wind, rain, and sun. At the same time, this shelter can accommodate a small fire inside it. A smoke hole in the roof of the shelter can also provide proper ventilation. To build your round lodge shelter, you must first collect tree limbs and branches that are around five to eight feet long in length. Next, find a form of thatching, such as grass, that you can use to tie the branches together. Next, stack the branches in the shape of a triangular cone. Once your shelter begins to take form, you can create a doorway by horizontally placing a few branches together in the opening of your shelter, just a few feet off the ground.
Lean-to shelter
This primitive shelter is one of the most widely used makeshift shelters, since it can easily be put together in less than an hour. Its basic, one-sided design makes it easy to build using nearly any kind of material. However, this simple design has two main drawbacks. First, a lean-to shelter can only provide protection from one side, such as protection against strong winds that only blow in one direction. Second, it doesn’t retain heat very well. A lean-to shelter can still be incredibly useful in certain situations, but it is not meant to provide long-term shelter. To build your lean-to shelter, try to find two trees that can support a stout pole between them. Next, secure the pole horizontally across the trees to serve as a support strut. Then, stack more poles and branches along the support strut to create a slanted wall. Cover the exterior of this wall with leaves, grass, palm fronds, or any other vegetation you can find.
Sponsored solution from the Health Ranger Store: Lab-verified Nascent Iodine solution is a dietary supplement that provides your body with supplemental iodine to help protect your thyroid during radiation exposure. Nuclear accidents such as Fukushima (or nuclear war) can expose your body to radioactive iodine-131, a dangerous radioisotope. Pre-loading your system with stable iodine occupies the iodine receptor sites on your organs, causing your body to naturally expel radioactive iodine you may have been exposed to through air, food, water or milk products. This defensive strategy is recommended by nearly all health authorities, worldwide, including the Nuclear Regulatory Commission. Discover more at this link.
Leaf hut
The two-sided leaf hut is basically an upgraded version of a lean-to shelter. This allows it to provide greater insulation and protection against the elements. To build a leaf hut, you will first need to find a sturdy pole around eight- to 12-feet long. Next, prop your ridge pole against a natural fork formation, such as a stump, tree, rock, or two forked prop sticks. Create “ribs” along your ridge pole by stacking branches at an angle on both sides of the pole. Cover the walls with moss, grass, leaves, pine needles, and other vegetation, but keep the ribs close together to prevent the covering from falling through. Around two to three feet of vegetation on each side of your leaf hut should be enough to trap heat and air keep you dry inside. (Related: How to make a formidable temporary shelter when SHTF.)
Snow cave
Being stranded in a snowy area can leave you with limited options for a survival shelter. You might have no other choice but to build a snow cave. However, great caution must be taken in building this shelter. If built incorrectly, it might not be able to provide proper ventilation. The ceiling might even collapse and bury you alive. Still, with enough practice, you should be able to safely create your own snow cave by finding a deep, solid snowbank and digging into the immediate left of it. Create a “cold well” by forming a tunnel into a low spot, where the cold air can accumulate. Past the cold well, you can start digging upwards to create a solid base for a sleeping platform. Lastly, dig a six-inch wide hole at the roof of your snow cave for ventilation.
Sources include:
Tagged Under: bug out, emergencies, leaf hut, lean-to shelter, off grid, preparedness, prepper, prepping, round lodge shelter, self sufficiency, shelter, SHTF, snow cave, survival, survival shelter, survivalist, wilderness
RECENT NEWS & ARTICLES